Lync Mobile for Android

Lync Mobile for Android Updated!

 
When the full suite of Lync mobile clients first came out, the Android experience was less than thrilling.  One key feature missing was the ability to use the mobile client to make the Lync server call your mobile phone and then connect you to the person you are calling (call-via-work).  All the other mobile clients had that feature, and the reason given was that it was difficult to program in Android’s fragmented OS space.  Fair enough, but it certainly wasn’t a barrier to the hundreds of thousands of other apps that are available for Android.

It seems as though someone at MS finally got the message and they’ve just released a Lync Mobile update for Android in the Market.  When I was at the Lync 15 Airlift last week, they said there would be an update “in a few months”.  Happily, they should have said “a few days”.  Wish this were the way for all upcoming MS products.  The details for the update are as follows:

What’s in this version:
  1. Enabled call-via-work – allowing Enterprise Voice enabled users to make and receive calls using your Enterprise Voice (Lync ID) number only. Connect with others using a single identity.
  2. Added user controls for adjusting the sound/vibration for incoming notifications
  3. Improved the Lync status icon : know if you can receive IM messages
  4. Enabled copy of IM text to the clipboard
  5. Multiple bug fixes

Of course, I installed the update and had a poke around.  Right off the bat, Lync Mobile asked me to verify my mobile number to be used for Lync to phone me back when using Call-via-Work.  Immediately, it seemed as though the client was more responsive than before. This could just be wishful thinking, but it did seem snappier.

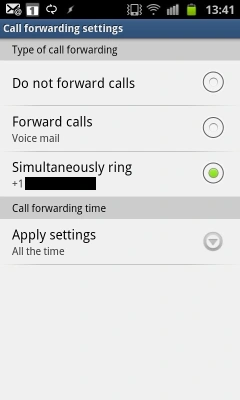
The My info screen now gives the ability to change your call forwarding settings, in addition to the usual ability to change my status from Available to Busy/Away etc.

Clicking on Call forwarding takes you to a screen where you can edit your settings.  Any changes you make here are immediately reflected in your Lync desktop client.

The Options screen has new options for changing sound and vibration settings.  When you select those options, you are able to change it to System settings or Never.


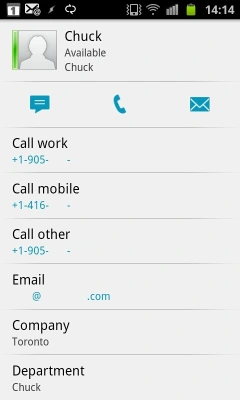
The Contacts screen looks the same as before.  Status updates did seem quicker than before, so maybe that was part of the bug fixes. Clicking on a user brings up the same screen.  No changes to the UI were noted here.

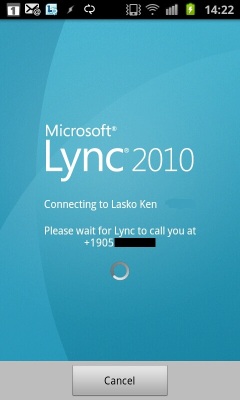
Before the update, when you clicked a phone number, it would just use your mobile phone to make the call. There was no integration with Lync.  Now, when you make a call, Lync will notify you to answer the next incoming call.

The next call will appear to be coming from your office phone number, which you should recognize.  As soon as you pick up the call, you’ll hear it ringing the other end.  That user will also see your office phone number.  This effectively hides your mobile number from other users and will also be useful in situations where incoming mobile calls are free or where a call would be cheaper when being made through the Lync server PSTN connection.

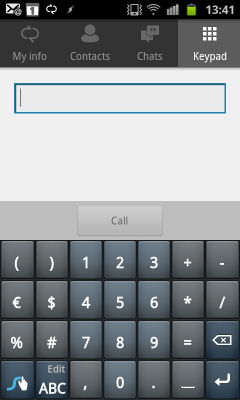
There is a new screen called Keypad.  From here, you can dial a number directly.  As with the previous example, the Lync server will call your mobile number and then connect you to the number.  One thing I noticed is that the normal normalization rules don’t seem to kick in. So, I have to dial the full 11-digits instead of 10-digits like I normally do (Lync adds the 1 for me).

The most welcome addition for me was the ability to do one-click meeting joins from my Android phone.  Before the update, I would have to manually enter the conference ID info, which would mean memorizing or writing down the confID and then entering it.  Tough to do when you’re trying to join a call from a car.  Now, you can just click the meeting invite from your email, and it will call you and connect you to the meeting seamlessly.  Even better, when I tested this feature while I was already joined to a meeting via Lync on my desktop, it dropped the desktop audio and seamlessly joined me via my mobile.  So, if you have to leave, you can transfer to your mobile without missing a beat.  Very slick and impressive!

The notification icon has also been updated to be more informative.  While Lync is running and actively connected, you’ll see the familiar Lync icon in your notification bar.  When Lync is disconnected, the icon will show a little X (as highlighted in red below).

Since there isn’t a Lync push notification service for Android, you won’t get conversation updates when disconnected.  However, if your phone works like mine (using JuiceDefender), the phone will shut off all network connectivity when not being actively used, but will periodically do a check. At that point, you will get any queued notifications. The user at the other end might get a failed delivery notification, so this isn’t a very clean way to operate.

Even with the downsides, these updates are an extremely welcome addition to the Android Lync client.  This brings Lync for Android up to near-feature parity with the other mobile clients.  This Android fan is extremely happy!

Leave a comment

Filed under Uncategorized

Microsoft Lync 2010 for Mobile clients Reference

Microsoft Lync 2010 for Mobile Clients


If your organization uses Lync, you can download a Microsoft Lync 2010 app for your mobile device to stay connected on the go. For a list of features supported on each mobile device, see the Mobile Client Comparison Tables* in the Microsoft TechNet library.

This page lists the mobile devices for which Lync 2010 mobile apps are available. Also included are links to resources that will help you get started with using Lync 2010 on your mobile device.

 NOTE    Items marked with an asterisk (*) are not optimized for mobile devices and are best viewed from a PC.

Microsoft Lync 2010 for Windows Phone

Microsoft Lync 2010 for iPhone

Microsoft Lync 2010 for iPad

Microsoft Lync 2010 for Android

Microsoft Lync 2010 for Nokia (Symbian)

Leave a comment

Filed under Uncategorized

Lync Server 2010 – Mobility Deep Dive – Autodiscover Service

Microsoft Lync Server 2010 Autodiscover Service–not to be confused with Exchange Autodiscover Service–is a new Lync Server service introduced in the Lync Mobility feature update that was released inCumulative Update for Lync Server 2010: November 2011. This article provides more depth about Lync Autodiscover, its purpose, and how mobile clients utilize its functionality.

AuthorGreg Anthony

Publication date: April 25, 2012

Product version: Cumulative Update for Lync Server 2010: November 2011

Introduction

The Lync Autodiscover Service is a component that the Lync Mobile client queries to find a user’s home pool URLs for the various Lync Server Web Services, such as Autodiscover, Mobility, Reach (Lync Web Access), Meet, Address Book Service, and Distribution List Expansion. In a nutshell, Autodiscover provides information to a Lync Mobile client so that the client can connect, authenticate to the user’s home pool, and access Lync provided resources.

While Lync SIP clients currently use DNS service locator records (SRVs), this service provides a process for the Lync Mobile application to utilize over HTTP and HTTPS.

Architecture

Lync Autodiscover Service is installed as part of Lync Web Services as shown in Figure 1.

Figure 1. Lync Autodiscover

It is installed on both the Lync Server external and internal web sites.

To initiate discovery, the client takes the domain portion of the entered user’s SIP URI and composes a DNS lookup request for lyncdiscoverinternal with an appended domain. For exampleusername@contoso.com returns lyncdiscoverinternal.contoso.com. If the DNS query fails to return a result, the client repeats the process using lyncdiscover. The lyncdiscoverinternal record, as the name implies, is expected to be defined in the internal DNS as either a DNS A record or CNAME record. The DNS record points to a Lync Server that has Autodiscover installed in IIS, such as a Director, or Lync Front End Server. Lyncdiscover is expected to be defined in external DNS and be resolvable from the Internet.

Lync Autodiscover, when installed as part of Lync Web Services, listens on ports 80 and 443 on the Lync Server internal web site and ports 8080 and 4443 on the Lync Server external web site. Because 80 and 443 are well known ports for HTTP and HTTPS traffic, the client does not need to specify a port number when connecting to Autodiscover internally. Lync Server external web site ports are bridged externally from the external port 80 and port 443 to their internally defined port 8080 and port 4443 by the reverse proxy, using appropriate web publishing rules. DNS SRV records are not used because they are not supported by some browsers and mobile platforms. Some corporate firewalls have configurations that block DNS SRV externally, which would block DNS lookup for hosted environments like Lync Online or Lync Server 2010 Hosting Pack.

When a successful result is returned from a DNS query, the client issues an HTTP request and HTTPS request asynchronously to the Autodiscover Service. The client makes requests in the following order:

If DNS lookup for lyncdiscoverinternal.contoso.com succeeds:

1. GET http://lyncdiscoverinternal.contoso.com/

2. GET https://lyncdiscoverinternal.contoso.com/

If DNS lookup for lyncdiscover.contoso.com succeeds:

1. GET http://lyncdiscover.contoso.com

2. GET https://lyncdiscover.contoso.com

If both lyncdiscoverinternal and lyncdiscover succeed, the client uses the response from lyndiscoverinternal.

HTTP is used as an entry point because it is not feasible, in hosted Lync Server 2010 online deployments, to update external facing certificates subject alternate names (SANs) for each hosted tenant’s domain. Using HTTPS would quickly exceed the max size of a certificate or the allowed limit of a client/server handshake message, when negotiating a secure connection.

For on-premise deployments of Lync Server 2010 it is highly recommended to request and assign certificates with the SANs updated to include lyncdiscover.<SIP domain> or lyncdiscoverintenal.<SIP domain>.

Because Lync discover DNS records can be created as either CNAME records or Host A records, CNAME records could be entered with domains that do not match the domain or zone of the Autodiscover Service or reverse proxy certificate configuration. Therefore when the client sends a HTTPS request and is redirected to a different zone (non-matching domain), the certificate presented by that zone will not match what the client expects and is blocked. When the request is made using HTTP, there is no certificate mismatch on a zone change because this is an unsecure connection and the request passes through to the Autodiscover Service. Autodiscover supplies a secure URL in response to the client, as shown in Figure 2.

Figure 2. Autodiscover http redirect to secure URL

The client verifies the domains of the URLs received in the response, match the requested domains. If they do not match or if any domain included in the client trust model, like online.lync.com or onmicrosoft.com, the client prompts the user to confirm trust before continuing.

IIS URL Rewrite rules map Autodiscover requests with no virtual directory to the root entity. Rewrite rules can be viewed in the IIS Manager console as shown in Figure 3. For more information on URL Rewrite Module see URL Rewrite.

Figure 3. URL Rewrite Rules

Authentication

Lync Autodiscover Service provides two resources that are visible to clients. These resources are <FQDN>/Autodiscover/AutodiscoverService.svc/root/domain and <FQDN>/Autodiscover/AutodiscoverService.svc/root /user.

The root/domain is accessed anonymously to provide general topology information for the current location like the FQDN of the pool. It can also be used as a resource in troubleshooting, and can be queried using a browser to verify that the Lync Autodiscover Service is installed, operating, and returning the expected URLs.

The root/user URL interface requires authenticated access and is used by the client to discover URLs for the user’s home pool services. Client requests with invalid credentials or no web-ticket present in the header, receive an HTTP/1.1 401 Unauthorized response with the X-MS-Web TicketURL in the response header (that is X-MS-WebTicketURL: https://<lyncfrontendserver&gt;.contoso.com/WebTicket/WebTicketService.svc).

Interrelationships

Lync Servers with the Standard Edition or Enterprise Edition role installed are Registrars. Registrars maintain user information in a database. Lync Autodiscover is installed on each server hosting the Registrar role. While users are not homed on Directors, Autodiscover Service is installed on them, as they provide a registrar lookup service. The Autodiscover Service queries the Registrar database to look up the user’s home pool information from the Registrar database and redirects the user to the Autodiscover Service on their home pool so the client has up-to-date information on the available web services in their pool.

All web URLs for a Lync pool are published to the Central Management Store using Lync Server Topology Builder or Lync Server Management Shell cmdlets. Lync Autodiscover retrieves the web component URL information from the Central Management Store.

Lync Autodiscover Scenario

In the following sample scenario, the topology consists of a reverse proxy, Lync Director, and Lync Front End server. The Director and Lync Front End Servers have been configured for Lync Mobility.

Note: If there is no Director in the topology, requests are sent to a Front End Server that performs the function of the Director, such as looking up the referenced user’s home pool an d returning that information when requested.

Figure 4 depicts a typical Lync Mobile client sign in interaction and call flow with the Lync Autodiscover Service up to the point of connecting to the Mobility Service and completing sign in.

1. DNS query: lyncdiscoverinternal.contoso.com resolves to IP address of director.contoso.com.

2. Client constructs URL and sends an HTTP GET request to director.contoso.com/?sipuri=user@contoso.com.

Client receives two links in the response. One link is for thehttps://director.contoso.com/Autodiscover/AutodiscoverService.svc/root/domain resource and the other link is for the https://director.contoso.com/Autodiscover/AutodiscoverService.svc/root/userresource.

3. Client constructs URL and sends an HTTPS GET request to director.contoso.com/?sipuri=user@contoso.com

Client receives two links in the response. One link is for thehttps://director.contoso.com/Autodiscover/AutodiscoverService.svc/root/domain resource and the other link is for the https://director.contoso.com/Autodiscover/AutodiscoverService.svc/root/userresource.

4. Based on which request succeeds from step 2 or 3 and is received first, the client uses that response to make a request to thehttps://director.contoso.com/Autodiscover/Autodiscover.svc/root/user to retrieve specific user home pool information.

Client receives 401 Unauthorized response with Web Ticket Service (WTS) location in the header.

5. Client submits a request to the Web Ticket Service to retrieve the metadata exchange document (MEX).

6. Client submits a Request Security Token to Web Ticket Service and supplies credentials.

7. Web Ticket is returned to the client. (There are two POST and two 401 Unauthorized as part of the Web Ticket Service authentication negotiation not shown here.)

8. Client makes request again to thehttps://director.contoso.com/Autodiscover/Autodiscover.svc/root/user to retrieve specific user home pool information and provides the web ticket.

Lync Autodiscover service obtains user’s Uri from web ticket.

Lync Autodiscover retrieves user info from registrar database and retrieves the user’s home pool.

9. Lync Autodiscover sends “Redirect” with location in xml to user’s home pool <Link token=”Redirect” href=”https://pool.contoso.com/Autodiscover/AutodiscoverService.svc/root?sipuri=sip:user@contoso.com&#8221; />

10. Client repeats steps 4 through 8 against their home server.

11. Lync Autodiscover responds with the internal and external Lync services URLs for the user’s home pool.

<?xml version=”1.0″ encoding=”utf-8″?>

<AutodiscoverResponse AccessLocation=”Internal” xmlns:xsi=”http://www.w3.org/2001/XMLSchema-instance&#8221; xmlns:xsd=”http://www.w3.org/2001/XMLSchema”&gt;

<User>

<SipServerInternalAccess fqdn=”pool.contoso.com” port=”5061″/>

<SipClientInternalAccess fqdn=”pool.contoso.com” port=”5061″/>

<SipServerExternalAccess fqdn=”sip.contoso.com” port=”5061″/>

<SipClientExternalAccess fqdn=”sip.contoso.com” port=”5061″/>

<Link token=”Internal/Autodiscover” href=”https://pool.contoso.com/Autodiscover/AutodiscoverService.svc/root”/&gt;

<Link token=”Internal/AuthBroker” href=”https://pool.contoso.com/Reach/sip.svc”/&gt;

<Link token=”External/Autodiscover” href=”https://directorexternalwebfqdn.contoso.com/Autodiscover/AutodiscoverService.svc/root”/&gt;

<Link token=”External/AuthBroker” href=”https://directorexternalwebfqdn.contoso.com/Reach/sip.svc”/&gt;

<Link token=”Internal/Mcx” href=”https://directorexternalwebfqdn.contoso.com/Mcx/McxService.svc”/&gt;

<Link token=”External/Mcx” href=”https://directorexternalwebfqdn.contoso.com/Mcx/McxService.svc”/&gt;

</User>

</AutodiscoverResponse>

The client then continues to connect to the Mobility Service and sign in.

The Autodiscover response provides a hint to the client for example AccessLocation=”Internal” as highlighted in Figure 4. The response is either the internal Lync web services or external Lync web services and as determined by the Autodiscover Service.

In the final Autodiscover response, both internal and external URLs are provided. These URLs are cached by the client. In the event of connectivity failure to one set of URLs, for example when moving between wireless connectivity and cellular coverage, the client attempts to use the other set of URLs. If both sets of URLs fail, they are flushed from cache and the client repeats the Lync discovery process.

In Figure 4, step 9 illustrates a redirect from the Director Autodiscover service to the user’s pool Autodiscover Service. The client detects redirect loops and does not allow more than 10 redirects. This client functionality prevents endless redirects if a problem in the redirect logic exists that might cause an infinite loop.

Figure 4. Typical Autodiscover Flow

Diagnosing Lync Autodiscover Issues

Client DNS Resolution

The client has a dependency on being able to query and resolve DNS records for the Lync Autodiscover Service. The primary DNS records required are lyncdiscoverinternal.<yoursipdomain> and lyncdiscover.<yoursipdomain> which point to a Lync Pool (or to a Director if one is deployed). If multiple pools are enabled for Mobility, the DNS records for the Lync web services for each pool must also be published in DNS. This enables clients to resolve redirects from Autodiscover on the Director, to Autodiscover on the user’s home pool. If the client is external, appropriate web publishing rules need to be created or updated on the reverse proxy. For Microsoft Office 365 Lync Online, a re-delegated domain only needs a DNS CNAME record lookup for lyncdiscover.<your_domain> pointing to webdir.online.lync.com. All clients are external to Office 365. For additional information see You cannot sign in to Lync Online by using a domain that is configured for full redelegation .

Other considerations with DNS resolution are that mobile devices receive DNS lookups from the mobile carrier, the Wi-Fi connection, or both. You can use NSLookup against public DNS servers to check for proper entry and use a site like http://www.whatsmydns.net to check propagation. If you are using a wireless network to connect to your internal network, and are using a split-DNS configuration where your internal DNS domain and forward lookup zone is the same as your public domain, then your internal DNS server will normally be authoritative for any DNS queries to that domain. The external records published in external DNS for the external web FQDNs for your pools; need to be published in the internal DNS so clients connected over the wireless network can resolve the records internally.

There may be mobile apps available in the market place that can display the mobile carrier DNS settings on your device. Otherwise, you can contact your carrier. For Wi-Fi connections, you can normally view this in the wireless settings of your device.

The client logs provide clues about successful DNS lookups. For information on collecting logs on mobile clients see Technical Considerations for Mobile Clients.

Figure 5 provides sample client logs that fail to complete discovery for lyncdiscoverinternal. All three devices were connected over 3G, not Wi-Fi, so failure on lyncdiscoverinternal.contoso.com is expected. The sections in the individual device logs showing the failure are highlighted.

Figure 5. Lync for Windows Phone Log

Figure 6. Lync for iPhone log

Figure 7. Lync for Android log

The above logs would be similar for lyncdiscover.contoso.com if a device was connected to your corporate wireless network. The logs shown here are abbreviated for space and may not contain all information such as the parallel request for https://lyncdiscoverinternal.contoso.com that would also fail discovery because it is the same DNS record.

Failure to resolve both lyncdiscoverinternal and lyncdiscover DNS records will result in client UI error message: Cannot connect to the server. It might be unavailable. Also please check the network connection, sign-in address and server addresses.

If you have not configured automatic discovery for the mobile client, you can override auto-detect in the client application by deselecting the auto-detect server check box. Deselecting the check box reveals the manual settings where the user can input the internal and external discovery addresses. This is useful for troubleshooting scenarios.

The advantage of manual settings is that you do not have to request new certificates with lyncdiscover.<sipdomain> and lyncdiscoverinternal.<sipdomain> added to the certificate(s) subject alternative name field, for the reverse proxy web publishing rules, and the Lync Server Web Services sites.

The disadvantage of manual settings is you must provide users with the URLs that they need to manually enter. Manual entries increase the chance for typographical errors, which in turn increases support desk calls. You also need to notify users of the URL changes they need to make, if you make changes to the Lync topology that affect sign on. You can still point to the Director web FQDNs and Autodiscover Service to issue a redirect to the user’s pool FQDN.

Though supported, it is not recommended to configure a web publishing rule on the reverse proxy that uses HTTP on port 80 that is processed before the HTTPS rules for your Lync web services in order to not request new certificates with the lyncdiscover SAN entries for the reverse proxy

SSL Encryption

HTTPS requests rely on Public Key Infrastructure (PKI). HTTP does not employ data encryption for client and server communication. HTTPS employs data encryption. The Internet Information Server (IIS) running Lync web services, implements Secure Sockets Layer (SSL), using an encryption protocol. SSL implementation accomplishes two things:

  1. The client performs certificate validation on the certificate provided by the server to validate the reverse proxy or Lync web server’s identity.
  2. Data is encrypted during transfer between Lync web service and the client.

An SSL connection attempt begins when the client perform an HTTPS request for lyncdiscoverinternal or lyncdiscover.

When the connection is established, the server transmits its certificate to the client.

To authenticate the server, the client uses the following tests to validate the certificate:

  • Ensures the server certificate chains to a trusted root certification authority (CA).
  • Ensures that the FQDN name in the certificate’s subject or subject alternate name field, matches the FQDN in the HTTPS URL.
  • Ensures that the server certificate is time-valid.
  • Ensures that the server certificate has not been revoked.

Failure of any of these tests can be inconclusive as to the actual cause as the client is dependent on the platform on which it is running as to the granularity of the information returned by the platform’s application programming interface (API). The sign in error returned could be a generic connection error, SSL error, or SSL certificate expired.

After a successful test, the client extracts the certificate’s associated public key.

Next, it creates a pre-master secret, which is a string of randomly created bits whose length is determined by the negotiation between the client and the server.

Then the client encrypts the pre-master secret with the server’s public key and sends the encrypted pre-master secret to the server.

The server decrypts the pre-master secret with its private key.

Depending on the cryptographic service provider (CSP) installed on the server, a Diffie-Hellman or a Rivest Shamir Adleman (RSA) negotiation allows the server and client to use the pre-master key to generate a symmetric session key using the same symmetric encryption algorithm.

The server and the client use this symmetric session key to encrypt the data transmitted between them. The session key is used until the client or the server terminates the HTTPS session.

SSL Encryption Issues

Mobile device operating systems come with most of the public trusted root certification authority chains pre-installed. Refer to the mobile device operating systems vendor support sites, the device manufacturer’s support site, or the wireless carrier’s support site and product documentation for a list of trusted root certificates installed in the device or other information related to managing certificates on a particular device.

Mobile devices do not have the trusted root certification chain installed for certificates issued from internal private certificate authorities. This can cause Autodiscover to fail when connected to corporate networks over a wireless network. Public CA root certificates also expire, change ownership, or one may not have been added to the device when it was originally released. You can verify that the device has the trusted root certification chain installed by opening the HTTPS manual discover FQDN using the web browser installed on the device. The web browser should return a warning similar to the following based on browser and platform;

  • Security Warning. There are problems with the security certificate for this site. This certificate is not from a trusted authority. (Android)
  • Cannot Verify Server Identity. (iOS). (Click Details to see if certificate shows as Not Trusted)
  • We’re having trouble with this site’s security certificate. It looks like the security certificate wasn’t issued by a trusted certificate authority. (Windows Phone 7.5)

In the browser, you can click the appropriate option to View certificateGet more information, or Detailsdepending on browser and platform to obtain additional information that may be useful in troubleshooting.

One way to install a root certificate on a device is to email it as an attachment, open it, and follow the prompts to install. You can publish the root certificate on a web site and install it by opening it from the device web browser. Apple also has the iPhone configuration utility for enterprise management of their devices. For links to more information on mobile devices and certificates, see the Additional Information section at the end of this article.

If the FQDN of the URL is not in the common name field (aka, subject name) or subject alternate name field of the server certificate, you should see similar security warnings. If you are unable to open the certificate and view in the mobile browser in this scenario, use Internet Explorer on a desktop, browse to the URL, click continue on to the site, and then click on the red X by Certificate. You should get a notification box that opens with Mismatched Address.

Conclusion

This article provides an initial deep dive on Lync Autodiscover, its purpose, and how mobile clients utilize it. This article does not, however, cover reverse proxy web publishing rules, IIS logging, Lync Server logging, or using other tools like Fiddler for troubleshooting the Lync Autodiscover Service. This article helps explain how Autodiscover works, why you need to update certificates, and how to resolve common connectivity issues.

Leave a comment

Filed under Uncategorized

Lync Inbound Normalization Rules

Back in OCS R2 it was possible to apply a Location Profile with a specific set of Normalization Rules to a Mediation Server for inbound normalization. Why do we need to do this? To get inbound calls into E.164 format for reverse lookups against users Tel URI’s.

The same configuration is still possible but in a slightly different way in Lync. As everyone probably knows by now the Mediation Server went through a number of changes with Lync along with the ability to talk to multiple gateways at the same time. This means that instead of applying a Location Profile to a Mediation Server, we now apply a Dial Plan to a Gateway in Lync. Of course you do not need to go this granular but if you have a multiple site deployment you may require different normalization rules on different gateways. This might occur when you are sending four digit extensions to Lync and you have an overlapping dial plan on two different PBX’s connected to two different gateways.

Figure 1. Dial plan

clip_image002

As you can see in figure 1 I already have two dial plans with normalization rules but I still want a dial plan for inbound normalization for my gateway.

Figure 2. Selecting Pool dial plan

clip_image004

I think the new ability to define the different normalization rules really has some great advantages. I no longer have to go to each individual Mediation Server to apply a Location Profile any more for inbound normalization. I can see it all in one place. Here I am going to select Pool dial plan. I can also apply a rule that will affect my entire site rather than on a pool or gateway which is fine if you do not need to be so granular.

Figure 3. Gateway selection

clip_image006

Here I have selected my gateway. I could have also selected a Pool or SBA to have the same effect but this is not as granular as the gateway.

Figure 4. Create dial plan and normalization rules

clip_image008

I have kept my normalization rule pretty simple. Basically this rule adds a + to any inbound 11 digit number. If I had a PBX that only sent the last 4 digits of a number I could have appended the rest of the number in a different rule or altered the inherited rule.

Figure 5. Saved uncommitted dial plan

clip_image010

I have saved my dial plan just not committed it.

Figure 6. Dial plan committed

clip_image012

Final step I have now committed my dial plan and I am done. Pretty simple really.

Comments welcomed.

Leave a comment

Filed under Uncategorized

Lync 2013 Calling Party Number Translation Rules

Lync 2013 Calling Party Number Translation Rules


Situation

You have internal users that are Enterprise Voice enabled, and they possess sufficient power/position to not want their DID to be advertised when they call out.  What to do?

With Lync 2010, you can manipulate ALL outbound calls from Lync to have a common Calling Party inserted into the call setup – but this manipulation occurs at the trunk level for every call no matter who is placing the call or from where in your environment.  One rule covers it all.

With Lync 2013, we can now manipulate the trunk action based on the Calling Party number.  For instance, let’s say the CEO calls out for some reason, but does not want their DID to be advertised.   Instead, they want the call to appear to be coming from the executive secretary. With Lync 2013 we can now provide this functionality and apply this to only specific numbers while the remainder of the calls go out as provided for in the general configuration.

Let’s take a quick look at how this is done.

The Solution

First, we assume that there is a valid Lync 2013 topology that includes at least one mediation server or mediation pool, and at least one valid trunk out to somewhere.  I also encourage a little test as shown – just to make sure that things are working as expected.

image

The sharp-eyed reader will note that I am using fellow MVP Ken Lasko’s LyncOptimizer.  No point in reinventing the wheel!

For our example, let’s stipulate that the CEO wants to dial out from his assigned DID number, but have it appear to the called party that the call is coming from the CEO’s secretary.  For this we will have:

CEO number (calling party): 503-312-1234

Secretary number:  999-234-9000

You may want to run a quick test on your trunk, just to make sure your calls behave properly.  Note that when you are testing at the trunk level, you need to consider what the normalization rule is going to add or subtract to the digits entered by the user.  From above, see that the dialed number: 5033121234 normalized to +15033121234, so this is the value to use for testing at the trunk.

image


NOTE:  My trunk needs to strip the “+” before sending the call out, and usually this happens on the default “Called number translation rule” that I put into place.  This new calling party translation rule will go around that other rule, so we need to be careful and take the “+” out when creating the new rule.

image


To start making the new outbound calling party rule, go to the “Calling number translation rules” and select “New.”

image

Name your new rule

image

Build the translation rule – see how the built-in logic gives you a mini-tutorial on the pattern match.  Slick. Remember the normalization will change what digits the user enters, and that you need to have the translation rule see the number as it trunk will get it from the route.  The length is also important as that can change how the TRUNK’s translation pattern works.  Digits to add is literally what you want to change the calling party into. 

image

Click on “OK” to finish.  And let’s test our work. At the bottom of the trunk configuration under “Associated translation rules”  there is another testing area. Be sure to select “Calling number.”

image


Remember to commit your changes!

Last Thoughts

I used an extreme case here to show the possibilities.  Your carrier may have some logic that will only accept numbers within your DID block as calling party numbers – if that is the case, you will need to confine yourself to using those numbers or have the CO potentially replace your carefully crafted calling party translation with a generic Caller ID value

Leave a comment

Filed under Uncategorized

How to change SID through sysprep

First, click to Start->Run, type sysprep and press OK.

sysprep1


This will open sysprep folder which is located in c:\Windows\System32. Open sysprep application.

sysprep2


This will open System Preparation Tool 3.14 window. As a System Cleanup Action select Enter System Out-of-Box Experience (OOBE)Important: select Generalize if you want to change SID, it’s not selected by default. As Shutdown Options select Reboot.

sysprep3


It will take some time for sysprep to finish, so grab a cup of coffee and wait.

sysprep4


After rebooting you’ll have to enter some data, for example, Country or region, Time and currency and Keyboard input.

sysprep5


Also, you’ll have to accept EULA. And that’s it. After booting, in Server Manager you’ll see that everything is changed, if you had some settings set now they’re changed.

sysprep6


Now you can again use PsGetSid to check that your OS has new SID.

Leave a comment

Filed under Uncategorized

Connecting Lync 2013 and Cisco Jabber

Lync 2013 now has a built-in XMPP gateway.  If you look closely, there is an XMPP component running on both the Lync FE and the Lync Edge.  Very easy to setup.  Simply hit the box for XMPP Gateway in Topology Builder, and when you deploy the server roles, the XMPP will be installed along with everything else.  Sweet!

But, how do we configure this thing?  There are a variety of guides on setting up for GMail.com – Google Chat. But what if you need to federate with another entity that is running – literally – Cisco Jabber (you know that CUPC thing).  There are two methods, one for doing the internal-share-the-namespace thing on 5061, and another for using XMPP across port 5269.  The second method is for our scenario: the other entity is completely outside of your control.

To configure Lync 2013 to share a SIP namespace with Cisco Jabber – see this document. To be totally fair, Cisco would have you follow this document when transitioning Lync users to Jabber – but I have never seen that sacred event occur.  I am sure it does, and will in the future, but the usage I have seen from this document is to get intradomain SIP namespace sharing instantiated.  Microsoft has excellent documentation for getting the XMPP setup for general purposes, and prescriptive guidance for federating with Gmail.com.  For this article, I am going to gloss over some of the aspects of that guidance; no need for me to re-invent (re-write?) the wheel.  What I will show is how to configure the basics, and then we will take a look at how to help your business partner configure their Jabber setup.

Let’s take a look at what is involved with getting Lync 2013 XMPP configured to federate with an external SIP namespace hosted by another organization and is using Cisco Jabber.  We will need Topology Builder, Lync Control Panel, maybe some PowerShell (depends on your whim), some external DNS work for your namespace, some external DNS work on your federated partner’s namespace, a little firewall configuration (on both namespaces).  If this was Christmas time, we’d also want to work with the partridge in the proverbial pear tree.

Lync Setup

As hinted at above, if you do this before you deploy any servers, at this point all you need to do is complete your topology, and when you publish and deploy Lync 2013 Servers, the bootstrapper will setup the XMPP functionality.  If you have a topology already deployed, and are enabling XMPP after the fact then you will need to do a bit more work.  Perhaps now would be a good time to review your certificate requirements.  Hopefully you planned in advance and are doing this before you deploy.  This is one of the reasons I wrote the following:  http://blogs.technet.com/b/nexthop/archive/2012/12/11/ten-tips-plus-one-for-implementing-lync-server.aspx. Take a look at items 1, 2, 3, and 6.

If you have Lync servers deployed and the XMPP is going to be added in, the Lync 2013 documentation has some excellent guidance that I will not attempt to re-write.  You can read that guidance here. Be sure to follow all the links provided in the table as they lay out the requirements for enabling XMPP.

Certificate requirements on your Lync 2013 Edge pool will be simplified if you do all of this before you deploy.  This is because the certificate wizard will see that XMPP is desired, and will populate the certificate request with your domain name. If you have multiple SIP domains, make sure that all of them that need XMPP federation are listed on the certificate request.  For the curious, all that is needed for the XMPP piece of the certificate is the domain name:  tsoorad.net, domain.com, etc.

Here is my Lync 2013 Edge certificate – you can see where the SAN has an entry for just the domain name. And yes, I included AV on my certificate even though that name is not needed. You can also see that I use this certificate for my Reverse Proxy (a TMG at this point in time).

image

In the Lync 2013 Topology Builder, open the properties of the your site, and then select  the check box “Enable XMPP Federation.”

image

From there, go to your Lync 2013 Edge Pool and edit the properties. What you want is the “Enable XMPP Federation for this Edge pool (port 5269) to be checked.

image

Next, publish the topology and either deploy the servers or update the servers. The official documentation referenced above has explicit guidance for doing either action.  You did read all that, yes?

DNS Internal

For XMPP support, the internal DNS is unchanged.  Your clients will communicate with the FE servers as normal.

DNS External

Whatever you do, don’t forget to create an _xmpp-server SRV record in your external DNS. The SRV definition is this:

_xmpp-server._tcp.domain.com with a target of your access edge A record.

In DNS-speak, this is seen as:

Name

TTL

Weight

Priority

Port

Target

_xmpp-server._tcp.domain.com

3600

0

0

5269

sip.domain.com

In my case:  _xmpp-server._tcp.tsoorad.net which points at sip.tsoorad.net.  Port requirement is 5269.

Firewall Requirements

5269 open in both directions.  Simple and sweet.  But!  Be sure to configure the firewall to pass 5269 to and from all possible Lync 2013 Access Edge IP addresses.  To whit, if you have a DNSLB Edge, then at a minimum you will have two IP addresses that will need to be bidirectional for port 5269.  If you have an HLB Edge, then the number goes to three minimum.  Failure to observe this requirement may result in random behavior.

Lync Control Panel

Once you have your server deployed, the edge server deployed, your firewall configured, and all the certificates are correct, open up your Lync Control Panel and go to the Federation and External Access tab so that we can create the settings for your Jabber federation.

image

First, make sure that the external access policy that applies to your users at whatever level have the “Federated User Access” selected, and that the Access Edge Configuration allows “Federated user access.”

image  image

Now, lets add our partner’s SIP domain in so that the Lync Edge thinks it is OK to at least attempt to communicate with the other domain.

Select the “XMPP Federated Partners” tab and click on “New.”

image

Fill in the blanks (literally) with the information required.  What is shown here is what I know works.

image

Note that the “Partner Type” here reflects the following:

  • Federated   A Federated partner type represents a high level of trust between the Lync Server deployment and the XMPP partner.  This partner type is recommended for federating with XMPP servers within the same enterprise or where there is an established business relationship.  XMPP contacts in Federated partners can:
    1. Add Lync contacts and view their presence without express authorization from the Lync user.
    2. Send instant messages to Lync contacts whether or not the Lync user has added them into their contact list.
    3. See a Lync user’s status notes.
  • Public verified   A Public verified partner is a public XMPP provider that is trusted to verify the identity of its users.  XMPP contacts in Public Verified networks can add Lync contacts and view their presence and send instant messages to them without express authorization from the Lync users.  XMPP contacts in public verified networks never see a Lync users’ status notes.  This setting is not recommended.
  • Public unverified   A Public unverified partner is a public XMPP provider that is not trusted to verify the identity of its users.  XMPP users on Public Unverified networks cannot communicate with Lync users unless the Lync user has expressly authorized them by adding them to the contact list.  XMPP users on public unverified networks never see Lync users’ status notes.  This setting is recommended for any federation with public XMPP providers such as Google Talk.

You will want to set this to what your organization requires.  This setting is “tiered” in the setting is most open at the “Federated” level, and most restrictive at the “Public unverified” setting.  For the unverified, your users will need to add the federated contact into their Lync contact list before expecting to be able to IM with the remote Jabber user.  This is roughly equivalent to the settings for a PIC provider verification level.

PowerShell

One of the things you are most likely to want to set, especially if you have more than one Edge server in either DNSLB or HLB, is the “DialBackPassphrase.”  This is done with the Set-CsXmppGatewayConfiguration cmdlet.  One setting fits all.  There is a default setting, but I like to set it manually to make sure it is set.  The command looks like this:

Set-CsXmppGatewayConfiguration -DialbackPassphrase Tsooraddialback

With the results looking like this:

image

Here is the list of XMPP related cmdlets.

Get-CsXmppAllowedPartner
Get-CsXmppGatewayConfiguration
New-CsXmppAllowedPartner
Remove-CsXmppAllowedPartner
Set-CsXmppAllowedPartner
Set-CsXmppGatewayConfiguration
Test-CsXmppIM

Note that there is a “test” cmdlet.  I recommend that you try that out before you proceed much further.  A complete description and usage for the Test-CsXmppIM cmdlet is here.

Setup XMPP Federated Partner

Now that our Lync 2013 XMPP is configured and published with Topology Builder, you deployed the servers (or modified them), changed your external DNS, modified your firewall, and changed your cert, have established your Jabber federated domain, and tested your setup, we can look at helping your Jabber friend with their setup.  The following is based on CUPC Server 8.6.1.

First, make sure that the partner has their external DNS SRV record correct.  You may want to inquire about their firewall and port 5269 at the same time.  Your bottom line is that until you can do the following from your Edge server, you have no hope of success.

image

Likewise, your Jabber partner must be able to do the reverse.  Here is how my lab looks to the world:

image

Go to the CUP Server and under Presence, Settings, check these boxes, especially the email one.

image

Under Presence, Inter-domain Federation, XMPP Settings, set to this: (ignore CUPC 7.0 support)  (note:  I did not configure the secret-take the default)

image

Then go to: Presence, Inter-domain Federation, XMPP, Policy and set as desired:

clip_image001

Then go to Messaging, Group Chat Server Alias Mapping and add all of the email domains your CUP server supports:

image

Restart all of the XCP services (but better to reboot the server if possible)

Down Here at the Bottom

We have looked at how to setup Lync 2013 XMPP Gateway and how to configure a Cisco CUPC 8.6.1 to Jabber to Lync across port 5269.  A few key take-aways:  DNS, certificates, firewalls, and prior planning.

Leave a comment

Filed under Uncategorized

Cumulative updates for Lync server 2013 – July 2013

Cumulative updates for Lync server 2013  – July 2013

http://support.microsoft.com/kb/2809243

Updates that are released for Lync Server 2013

  • Update for Core Components
    2835432 Description of the cumulative update 5.0.8308.420 for Lync Server 2013, Core Components: July 2013
  • Update for Conferencing server
    2835434 Description of the cumulative update 5.0.8308.420 for Lync Server 2013, Conferencing Server: July 2013
  • Update for Web Components server
    2835435 Description of the cumulative update 5.0.8308.420 for Lync Server 2013, Web Components: July 2013
  • Update for Standard or Enterprise edition server
    2819565 Description of the cumulative update 5.0.8308.420 for Lync Server 2013: July 2013
  • Update for Web Conferencing server
    2835507 Description of the cumulative update 5.0.8308.420 for Lync Server 2013, Web Conferencing Server: July 2013
  • Update for Mediation server
    2796554 Description of the cumulative update 5.0.8308.291 for Lync Server 2013, Mediation Server: February 2013
  • Update for Unified Communications Managed API 4.0, Core Runtime 64-bit
    2835437 Description of the cumulative update 5.0.8308.420 for Lync Server 2013, Unified Communications Managed API 4.0 Runtime: July 2013
  • Update for Call Park Service
    2835440 Description of the cumulative update 5.0.8308.420 for the Lync Server 2013, Call Park service: July 2013
  • Update for Persistent Chat server
    2835433 Description of the cumulative update 5.0.8308.420 for Lync Server 2013, Persistent Chat: July 2013
  • Update for Unified Communications Managed API 3.0 Workflow APIs
    2835438 Description of the cumulative update 5.0.8308.420 for Lync Server 2013, UCMA 3.0 Workflow APIs: July 2013
  • Update for Administrative Tools
    2837510 Description of the cumulative update 5.0.8308.420 for Lync Server 2013, Administrative Tools: July 2013


To install updates for Lync Server 2013 that has the February, 2013 cumulative update installed, you must perform the following steps 1 and 2.

To install updates for Lync Server 2013 RTM, you must perform the following steps 1-5.

Step 1: Install the cumulative updates

Important To maintain a functional Lync Server 2013 Enterprise Edition pool, you must make sure that Ready is returned for theState value of the pool when you run the Get-CsPoolUpgradeReadiness cmdlet and that you have the appropriate number of Lync Server 2013 front end servers that are running. Please see the “Upgrade or Update Front End Servers” and “Planning for the Management of Front End Pools” section of the following TechNet topic to determine the State valueof the pool before you apply the cumulative update.

The Cumulative Server Update Installer applies all updates for the appropriate server role in one operation. To use the Cumulative Server Update Installer, follow these steps.

Note If User Account Control (UAC) is turned on, you must start the Cumulative Server Update Installer by using elevated permissions to make sure that all updates are installed correctly.

To download the Cumulative Server Update Installer, go to the following Microsoft Download Center website:

Download

Download the update package now.

Lync Server 2013 Enterprise Pools

The front end servers in an Enterprise Edition pool are organized into upgrade domains. These upgrade domains are subsets of front end servers in the pool. Upgrade domains are created automatically by Topology Builder.

You must upgrade one upgrade domain at a time, and you must upgrade each front-end server in each upgrade domain. To do this, take one server in an upgrade domain offline, upgrade the server, and then restart it. Then, repeat this process for each server in the upgrade domain. Make sure that you record which upgrade domain and servers that you have upgraded.

Upgrade or Update Front End Servers

To upgrade front end servers, you must follow these steps:

  1. On a front end server in a pool, run the following cmdlet:

    Get-CsPoolUpgradeReadinessState

    If the State value of the pool is Busy, wait for 10 minutes, and then try to run the Get-CsPoolUpgradeReadinessStatecmdlet again. If you see Busy for at least three consecutive times after you wait 10 minutes in between each attempt, or if you see any result of InsufficientActiveFrontEnds for the State value of the pool, there is an issue with the pool. If you cannot resolve this issue, you may have to contact Microsoft Support. If this pool is paired with another front end pool in a disaster recovery topology, you must fail the pool over to the backup pool, and then update these servers in this pool. For more information about how to fail over a pool, go to the following Microsoft website:

    If the State value of the pool is Ready, go to step 2.

  2. The Get-CsPoolUpgradeReadinessState cmdlet also returns information about the upgrade domains in the pool, and about which front end servers are in each upgrade domain. If the ReadyforUpgrade value for the upgrade domain that contains the Server that you want to upgrade is True, you can upgrade the server. To do this, you must follow these steps:
    1. Stop new connections to the front end server(s) by using the Stop-CsWindowsServices -Graceful cmdlet.
    2. Run the Cumulative Server Update Installer by using the UI or by using a command to upgrade the front end server(s) associated with an upgrade domain.

      NOTE: If you upgrade or update front end servers during scheduled server downtime, you can run the cmdlet in step 2 without the -Graceful parameter. More specifically, run the cmdlet as Stop-CsWindowsService. This action immediately shuts down services, and the server does not wait until each existing service request is fulfilled.

      Note The UI provides a clear indication of which updates are installed when you click Install Updates.

      To run the Installer, run the following command:

      LyncServerUpdateInstaller.exe

      Notes The following text describes parameters that you can use together with theLyncServerUpdateInstaller.exe command:

      • The /silentmode switch applies all applicable updates in the background.
      • The /silentmode /forcereboot switch applies all applicable updates in the background, and then automatically restarts the server at the end of the installation process if this is necessary.
      • The /extractall switch extracts the updates from the installer and saves the updates in a subfolder that is named “Extracted” in the folder in which you ran the command.
    3. Restart the server(s) and make sure that it is accepting new connections.

Lync Server 2013 Standard Edition and other Roles

To run the Cumulative Server Update Installer, use the UI or running a command line.

Note The UI provides a clear indication of which updates are installed when you click Install Updates.

To run the Installer, run the following command:

LyncServerUpdateInstaller.exe

Notes The following text describes parameters that you can use together with the LyncServerUpdateInstaller.exe command:

  • The /silentmode switch applies all applicable updates in the background.
  • The /silentmode /forcereboot switch applies all applicable updates in the background, and then automatically restarts the server at the end of the installation process if this is necessary.
  • The /extractall switch extracts the updates from the installer and saves the updates in a subfolder that is named “Extracted” in the folder in which you ran the command.

Step 2: Apply the back end database updates

After you install the update for the Core Components server role on a Lync Server 2013 Enterprise Edition front end server or on a Lync Server 2013 Standard Edition server, the updated SQL database files are dropped to the computer that has the Core Components server role installed. To apply the database changes, you have to run the applicable cmdlets run the applicable cmdlets that are described in step 2.

Note The Update parameter is not required when you run the Install-CsDatabase cmdlet to update the Lync Server 2013 databases.

Lync Server 2013 Standard Edition

Install-CsDatabase -ConfiguredDatabases -SqlServerFqdn SE.FQDN -Verbose

Note You must run the cmdlet on the Lync Server 2013 Standard Edition server.

Lync Server 2013 Enterprise Edition

You must perform several configuration operations, depending on the kind of Lync Server 2013 Enterprise Edition back end servers that you are using.

Note If Persistent Chat is collocated (Persistent Chat front end service and back end database are running on the same server), you must run the following command together with the ExcludeCollocatedStoresparameter.

Note If database mirroring is enabled for your back end databases, we strongly recommended that you use the Invoke-CsDatabaseFailover -NewPrincipal Primary cmdlet and verify that the primary server is principal for all databases before you run the Install-CsDatabase cmdlet.

Install-CsDatabase -ConfiguredDatabases -SqlServerFqdn FEBE.FQDN -Verbose


Lync Server 2013 Persistent Chat Databases

When Persistent Chat Services are collocated with the SQL BE Databases, run the following command:

Install-CsDatabase -DatabaseType PersistentChat -SqlServerFqdn PChatBE.fqdn -SqlInstanceName DBInstance -Verbose


Lync Server 2013 Monitoring/Archiving/Persistent Chat Databases

When Lync Server 2013 Monitoring/Archiving/Persistent Chat databases are deployed on stand-alone SQL databases, run the following command:

Install-CsDatabase -ConfiguredDatabases -SqlServerFqdn SQLServer.FQDN -Verbose


Step 3: Apply the Central Management Database update

Note You do not have to update the Central Management Database in the following instances:

  • If the Central Management Store is homed on a Lync Server 2010 Standard Edition Server or Enterprise pool, do not run the Install-CsDatabase -CentralManagementDatabase cmdlets.
  • If the Central Management Store is homed on a Lync Server 2013 Standard Edition Server or Enterprise pool that was previously updated with the Lync Server 2013 February 2013 cumulative updates.

After the Lync Server 2013 Enterprise Edition front end server or the Lync Server 2013 Standard Edition Server backends are updated, run the following cmdlet to update the Central Management Store:

Install-CsDatabase -CentralManagementDatabase -SqlServerFqdn CMS.FQDN -SqlInstanceName DBInstanceName -Verbose

Note In a coexistence environment that contains both Lync Server 2010 and Lync Server 2013 in which the Central Management Service is located on a Lync Server 2010 pool, do not run the Install-CsDatabase -CentralManagementDatabase cmdlet. If you later move the Central Management Service to a Lync Server 2013 pool, you have to run the Install-CsDatabase -CentralManagementDatabase cmdlet to apply the changes.

Step 4: Enable the Mobility service

To enable the Mobility service, run the following cmdlet:

Enable-CsTopology

Step 5: Enable the Unified Communications Web API

To enable the Unified Communications Web API (UCWA), you must run the Bootstrapper.exe tool again on all Lync Server 2013 Director servers, Standard Edition servers, and Enterprise Edition front end servers on which the web components are installed and updated. The command to run the tool is as follows:

%ProgramFiles%\Microsoft Lync Server 2013\Deployment\Bootstrapper.exe


List of server roles and the updates that apply to them

Lync Server 2013 – Standard Edition server

  • Update for Core Components: KB 2835432
  • Update for Unified Communications Managed API 4.0, Core Runtime 64-bit: KB 2835437
  • Update for Standard/Enterprise Edition Server: KB 2819565
  • Update for Conferencing Server: KB 2835434
  • Update for Web Components Server: KB 2835435
  • Update for Web Conferencing Server: KB 2835507
  • Update for Mediation Server: KB 2796554
  • Update for Call Park Service: KB 2835440

Lync Server 2013 – Enterprise Edition – front end server and back end server

  • Update for Core Components: KB 2835432
  • Update for Unified Communications Managed API 4.0, Core Runtime 64-bit: KB 2835437
  • Update for Standard/Enterprise Edition Server: KB 2819565
  • Update for Conferencing Server: KB 2835434
  • Update for Web Components Server: KB 2835435
  • Update for Web Conferencing Server: KB 2835507
  • Update for Mediation Server: KB 2796554
  • Update for Call Park Service: KB 2835440

Lync Server 2013 – Edge server

  • Update for Core Components: KB 2835432
  • Update for Unified Communications Managed API 4.0, Core Runtime 64-bit: KB 2835437
  • Update for Standard/Enterprise Edition Server: KB 2819565

Lync Server 2013 – stand-alone Mediation server

  • Update for Core Components: KB 2835432
  • Update for Unified Communications Managed API 4.0, Core Runtime 64-bit: KB 2835437
  • Update for Mediation Server: KB 2796554

Lync Server 2013 – Director server

  • Update for Core Components: KB 2835432
  • Update for Unified Communications Managed API 4.0, Core Runtime 64-bit: KB 2835437
  • Update for Standard/Enterprise Edition Server: KB 2819565
  • Update for Web Components Server: KB 2835435

Lync Server 2013 – Persistent Chat front end server

  • Update for Core Components: KB 2835432
  • Update for Unified Communications Managed API 4.0, Core Runtime 64-bit: KB 2835437

Lync Server 2013 – Administration Tools

  • Update for Core Components: KB 2835432

Leave a comment

Filed under Uncategorized

SIP responses for reference

Can you list all known SIP responses?

1xx = informational responses

  • 100 Trying
  • 180 Ringing
  • 181 Call Is Being Forwarded
  • 182 Queued
  • 183 Session Progress

2xx = success responses

  • 200 OK
  • 202 accepted: Used for referrals

3xx = redirection responses

  • 300 Multiple Choices
  • 301 Moved Permanently
  • 302 Moved Temporarily
  • 305 Use Proxy
  • 380 Alternative Service

4xx = request failures

  • 400 Bad Request
  • 401 Unauthorized: Used only by registrars. Proxys should use proxy authorization 407
  • 402 Payment Required (Reserved for future use)
  • 403 Forbidden
  • 404 Not Found: User not found
  • 405 Method Not Allowed
  • 406 Not Acceptable
  • 407 Proxy Authentication Required
  • 408 Request Timeout: Couldn’t find the user in time
  • 410 Gone: The user existed once, but is not available here any more.
  • 413 Request Entity Too Large
  • 414 Request-URI Too Long
  • 415 Unsupported Media Type
  • 416 Unsupported URI Scheme
  • 420 Bad Extension: Bad SIP Protocol Extension used, not understood by the server
  • 421 Extension Required
  • 423 Interval Too Brief
  • 480 Temporarily Unavailable
  • 481 Call/Transaction Does Not Exist
  • 482 Loop Detected
  • 483 Too Many Hops
  • 484 Address Incomplete
  • 485 Ambiguous
  • 486 Busy Here
  • 487 Request Terminated
  • 488 Not Acceptable Here
  • 491 Request Pending
  • 493 Undecipherable: Could not decrypt S/MIME body part

5xx = server errors

  • 500 Server Internal Error
  • 501 Not Implemented: The SIP request method is not implemented here
  • 502 Bad Gateway
  • 503 Service Unavailable
  • 504 Server Time-out
  • 505 Version Not Supported: The server does not support this version of the SIP protocol
  • 513 Message Too Large

6xx = global failures

  • 600 Busy Everywhere
  • 603 Decline
  • 604 Does Not Exist Anywhere
  • 606 Not Acceptable

Leave a comment

Filed under Uncategorized

Lync 2013 PowerPoint Sharing: Some presenting features are unavailable due to server connectivity issues

Symptoms

Lync Client 

Users hosted on a Lync 2013 server and using Lync 2013 client are unable to add and present a PowerPoint presentation.  They get the following error in Lync: “Some presenting features are unavailable due to server connectivity issues”

WAC-Server

In the WAC server Application event log you see the following event popping up:

Log Name:      Application
Source:        ASP.NET 4.0.30319.0
Date:          17/01/2013 15:31:51
Event ID:      1310
Task Category: Web Event
Level:         Warning
Keywords:      Classic
User:          N/A
Computer:      server.domain.tld
Description:
Event code: 3008 
Event message: A configuration error has occurred. 
Event time: 17/01/2013 15:31:51 
Event time (UTC): 17/01/2013 14:31:51 
Event ID: 398a6469b56349ebae01d8aa9cc019d1 
Event sequence: 1 
Event occurrence: 1 
Event detail code: 0 
 
Application information: 
    Application domain: /LM/W3SVC/2/ROOT/m-1-130029067086927262 
    Trust level: Full 
    Application Virtual Path: /m 
    Application Path: C:\Program Files\Microsoft Office Web Apps\BroadcastServices_Host\ 
    Machine name: server 
 
Process information: 
    Process ID: 2004 
    Process name: w3wp.exe 
    Account name: NT AUTHORITY\NETWORK SERVICE 
 
Exception information: 
    Exception type: ConfigurationErrorsException 
    Exception message: Could not load file or assembly ‘Microsoft.Build.Utilities, Version=2.0.0.0, Culture=neutral, PublicKeyToken=b03f5f7f11d50a3a’ or one of its dependencies. The system cannot find the file specified. (C:\Program Files\Microsoft Office Web Apps\BroadcastServices_Host\web.config line 44)
   at System.Web.Configuration.CompilationSection.LoadAssemblyHelper(String assemblyName, Boolean starDirective)
   at System.Web.Configuration.AssemblyInfo.get_AssemblyInternal()
   at System.Web.Compilation.BuildManager.GetReferencedAssemblies(CompilationSection compConfig)
   at System.Web.Compilation.BuildManager.CallPreStartInitMethods(String preStartInitListPath)
   at System.Web.Compilation.BuildManager.ExecutePreAppStart()
   at System.Web.Hosting.HostingEnvironment.Initialize(ApplicationManager appManager, IApplicationHost appHost, IConfigMapPathFactory configMapPathFactory, HostingEnvironmentParameters hostingParameters, PolicyLevel policyLevel, Exception appDomainCreationException)

Could not load file or assembly ‘Microsoft.Build.Utilities, Version=2.0.0.0, Culture=neutral, PublicKeyToken=b03f5f7f11d50a3a’ or one of its dependencies. The system cannot find the file specified.
   at System.Reflection.RuntimeAssembly._nLoad(AssemblyName fileName, String codeBase, Evidence assemblySecurity, RuntimeAssembly locationHint, StackCrawlMark& stackMark, IntPtr pPrivHostBinder, Boolean throwOnFileNotFound, Boolean forIntrospection, Boolean suppressSecurityChecks)
   at System.Reflection.RuntimeAssembly.InternalLoadAssemblyName(AssemblyName assemblyRef, Evidence assemblySecurity, RuntimeAssembly reqAssembly, StackCrawlMark& stackMark, IntPtr pPrivHostBinder, Boolean throwOnFileNotFound, Boolean forIntrospection, Boolean suppressSecurityChecks)
   at System.Reflection.RuntimeAssembly.InternalLoad(String assemblyString, Evidence assemblySecurity, StackCrawlMark& stackMark, IntPtr pPrivHostBinder, Boolean forIntrospection)
   at System.Reflection.RuntimeAssembly.InternalLoad(String assemblyString, Evidence assemblySecurity, StackCrawlMark& stackMark, Boolean forIntrospection)
   at System.Reflection.Assembly.Load(String assemblyString)
   at System.Web.Configuration.CompilationSection.LoadAssemblyHelper(String assemblyName, Boolean starDirective)


Request information: 
    Request URL: https://wac.domain.tld:443/m/Presenter.aspx?a=0&e=true&WopiSrc=https://lyncfe.domain.tld/DataCollabWeb/wopi/files/1B-1-1DA545D&access_token=AAMFEMcXMba5uZVbva7TUp_-FpUGEMDL0-g4MKvhBFnFdDwj3oGBEMcXMba5uZVbva7TUp_-FpWCAuHYgyDo5MzCtEE9dxeIRDCiiZ3xBoHMQc25gcSH8JPJC5be-oYInVzkjRnDzwgIDURhdGFDb2xsYWJXZWI&fs=false&rec=false&thm=1&ui=en-US&rs=en-US& 
    Request path: /m/Presenter.aspx 
    User host address: A.B.C.D 
    User:  
    Is authenticated: False 
    Authentication Type:  
    Thread account name: NT AUTHORITY\NETWORK SERVICE 
 
Thread information: 
    Thread ID: 7 
    Thread account name: NT AUTHORITY\NETWORK SERVICE 
    Is impersonating: False 
    Stack trace:    at System.Web.Configuration.CompilationSection.LoadAssemblyHelper(String assemblyName, Boolean starDirective)
   at System.Web.Configuration.AssemblyInfo.get_AssemblyInternal()
   at System.Web.Compilation.BuildManager.GetReferencedAssemblies(CompilationSection compConfig)
   at System.Web.Compilation.BuildManager.CallPreStartInitMethods(String preStartInitListPath)
   at System.Web.Compilation.BuildManager.ExecutePreAppStart()
   at System.Web.Hosting.HostingEnvironment.Initialize(ApplicationManager appManager, IApplicationHost appHost, IConfigMapPathFactory configMapPathFactory, HostingEnvironmentParameters hostingParameters, PolicyLevel policyLevel, Exception appDomainCreationException)
 
 
Custom event details: 

Event Xml:
<Event xmlns=”http://schemas.microsoft.com/win/2004/08/events/event”&gt;
  <System>
    <Provider Name=”ASP.NET 4.0.30319.0″ />
    <EventID Qualifiers=”32768″>1310</EventID>
    <Level>3</Level>
    <Task>3</Task>
    <Keywords>0x80000000000000</Keywords>
    <TimeCreated SystemTime=”2013-01-17T14:31:51.000000000Z” />
    <EventRecordID>705</EventRecordID>
    <Channel>Application</Channel>
    <Computer>server.domain.tld</Computer>
    <Security />
  </System>
  <EventData>
    <Data>3008</Data>
    <Data>A configuration error has occurred.</Data>
    <Data>17/01/2013 15:31:51</Data>
    <Data>17/01/2013 14:31:51</Data>
    <Data>398a6469b56349ebae01d8aa9cc019d1</Data>
    <Data>1</Data>
    <Data>1</Data>
    <Data>0</Data>
    <Data>/LM/W3SVC/2/ROOT/m-1-130029067086927262</Data>
    <Data>Full</Data>
    <Data>/m</Data>
    <Data>C:\Program Files\Microsoft Office Web Apps\BroadcastServices_Host\</Data>
    <Data>server</Data>
    <Data>
    </Data>
    <Data>2004</Data>
    <Data>w3wp.exe</Data>
    <Data>NT AUTHORITY\NETWORK SERVICE</Data>
    <Data>ConfigurationErrorsException</Data>
    <Data>Could not load file or assembly ‘Microsoft.Build.Utilities, Version=2.0.0.0, Culture=neutral, PublicKeyToken=b03f5f7f11d50a3a’ or one of its dependencies. The system cannot find the file specified. (C:\Program Files\Microsoft Office Web Apps\BroadcastServices_Host\web.config line 44)
   at System.Web.Configuration.CompilationSection.LoadAssemblyHelper(String assemblyName, Boolean starDirective)
   at System.Web.Configuration.AssemblyInfo.get_AssemblyInternal()
   at System.Web.Compilation.BuildManager.GetReferencedAssemblies(CompilationSection compConfig)
   at System.Web.Compilation.BuildManager.CallPreStartInitMethods(String preStartInitListPath)
   at System.Web.Compilation.BuildManager.ExecutePreAppStart()
   at System.Web.Hosting.HostingEnvironment.Initialize(ApplicationManager appManager, IApplicationHost appHost, IConfigMapPathFactory configMapPathFactory, HostingEnvironmentParameters hostingParameters, PolicyLevel policyLevel, Exception appDomainCreationException)

Could not load file or assembly ‘Microsoft.Build.Utilities, Version=2.0.0.0, Culture=neutral, PublicKeyToken=b03f5f7f11d50a3a’ or one of its dependencies. The system cannot find the file specified.
   at System.Reflection.RuntimeAssembly._nLoad(AssemblyName fileName, String codeBase, Evidence assemblySecurity, RuntimeAssembly locationHint, StackCrawlMark&amp; stackMark, IntPtr pPrivHostBinder, Boolean throwOnFileNotFound, Boolean forIntrospection, Boolean suppressSecurityChecks)
   at System.Reflection.RuntimeAssembly.InternalLoadAssemblyName(AssemblyName assemblyRef, Evidence assemblySecurity, RuntimeAssembly reqAssembly, StackCrawlMark&amp; stackMark, IntPtr pPrivHostBinder, Boolean throwOnFileNotFound, Boolean forIntrospection, Boolean suppressSecurityChecks)
   at System.Reflection.RuntimeAssembly.InternalLoad(String assemblyString, Evidence assemblySecurity, StackCrawlMark&amp; stackMark, IntPtr pPrivHostBinder, Boolean forIntrospection)
   at System.Reflection.RuntimeAssembly.InternalLoad(String assemblyString, Evidence assemblySecurity, StackCrawlMark&amp; stackMark, Boolean forIntrospection)
   at System.Reflection.Assembly.Load(String assemblyString)
   at System.Web.Configuration.CompilationSection.LoadAssemblyHelper(String assemblyName, Boolean starDirective)

</Data>
    <Data>https://wac.domain.tld:443/m/Presenter.aspx?a=0&amp;e=true&amp;WopiSrc=https://lyncfe.domain.tld/DataCollabWeb/wopi/files/1B-1-1DA545D&amp;access_token=AAMFEMcXMba5uZVbva7TUp_-FpUGEMDL0-g4MKvhBFnFdDwj3oGBEMcXMba5uZVbva7TUp_-FpWCAuHYgyDo5MzCtEE9dxeIRDCiiZ3xBoHMQc25gcSH8JPJC5be-oYInVzkjRnDzwgIDURhdGFDb2xsYWJXZWI&amp;fs=false&amp;rec=false&amp;thm=1&amp;ui=en-US&amp;rs=en-US&amp;</Data&gt;
    <Data>/m/Presenter.aspx</Data>
    <Data>A.B.C.D</Data>
    <Data>
    </Data>
    <Data>False</Data>
    <Data>
    </Data>
    <Data>NT AUTHORITY\NETWORK SERVICE</Data>
    <Data>7</Data>
    <Data>NT AUTHORITY\NETWORK SERVICE</Data>
    <Data>False</Data>
    <Data>   at System.Web.Configuration.CompilationSection.LoadAssemblyHelper(String assemblyName, Boolean starDirective)
   at System.Web.Configuration.AssemblyInfo.get_AssemblyInternal()
   at System.Web.Compilation.BuildManager.GetReferencedAssemblies(CompilationSection compConfig)
   at System.Web.Compilation.BuildManager.CallPreStartInitMethods(String preStartInitListPath)
   at System.Web.Compilation.BuildManager.ExecutePreAppStart()
   at System.Web.Hosting.HostingEnvironment.Initialize(ApplicationManager appManager, IApplicationHost appHost, IConfigMapPathFactory configMapPathFactory, HostingEnvironmentParameters hostingParameters, PolicyLevel policyLevel, Exception appDomainCreationException)
</Data>
  </EventData>
</Event>

Background

Integration between Lync Server 2013 and WAC has been done correctly. If you followed the “Deploy Office Web Apps Server” guide this problem occurs because the Windows Server 2012 prerequisites powershell command is incomplete: you need to install the .NET Framework 3.5 feature for WAC to operate correctly. The “Configuring Integration with Office Web Apps Server and Lync 2013” Lync 2013 Library article doesn’t mention this either.

Solution

Use Server Manager to install the .NET Framework 3.5 Feature or use the following PowerShell command to add it afterwards:”Add-WindowsFeature NET-Framework-Features, NET-Framework-Core”

For new WAC installs use the following modified prerequisite installer script:

Add-WindowsFeature Web-Server,Web-Mgmt-Tools,Web-Mgmt-Console,Web-WebServer,Web-Common-Http,Web-Default-Doc,Web-Static-Content,Web-Performance,Web-Stat-Compression,Web-Dyn-Compression,Web-Security,Web-Filtering,Web-Windows-Auth,Web-App-Dev,Web-Net-Ext45,Web-Asp-Net45,Web-ISAPI-Ext,Web-ISAPI-Filter,Web-Includes,InkandHandwritingServices,NET-Framework-Features,NET-Framework-Core

Leave a comment

Filed under Uncategorized